You can individualize your communication by including your clients profile information – such as their first and last name, or their birthday – in the emails addressed to them.
This tutorial will explain how to add and format profile information in your newsletter and automated campaigns templates.
The following steps are illustrated with a Fastbuilder use case. The process is the same with the HTML and Easy Builder editors.
1. Introduction
Personalization fields are tags corresponding to profile fields that you can include in your templates, and that will be replaced with the information of each recipient and their received emails. You can use them to address each contact with their civility, first and last name, include their registration date or birthday, …
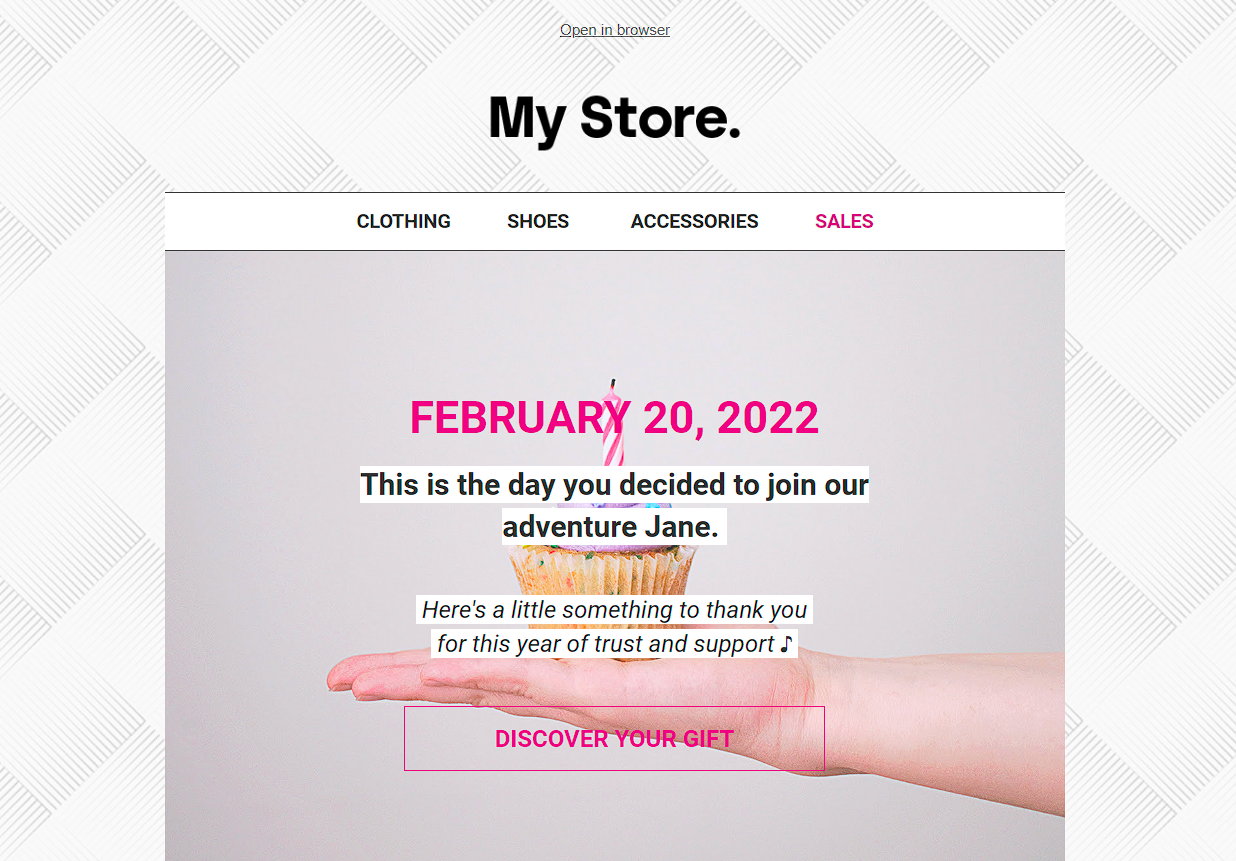
Example of a template personalized with the recipient first name and registration date
You can also define the format of those fields in the received emails with formatters. Formatters are expressions applied to personalization fields, to transform the data according to rules that you specify. You can, for example, capitalize the first and last name, or format the registration date field to display the date in full letters in the received message.
The Fast Builder, East builder and HTML editors all contain an expression building tool that allows you to define the formatters to apply to the personalization fields included in your templates.
2. Adding a personalization field
To add a personalization field in your template, place the cursor where you want to insert the information in your text and click on Perso field (1) in the toolbar to unroll the list of available fields.

Select the field you want to use : the corresponding tag will be automatically added to the text.
3. Formatting a personalization field
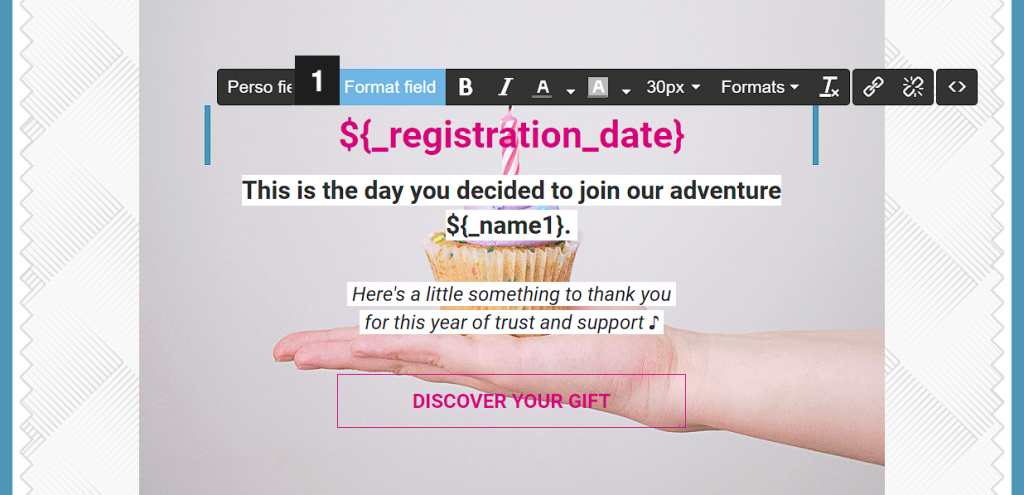
Place your cursor somewhere in the personalization tag you want to format and click on Format field (1) to open the expression building tool.
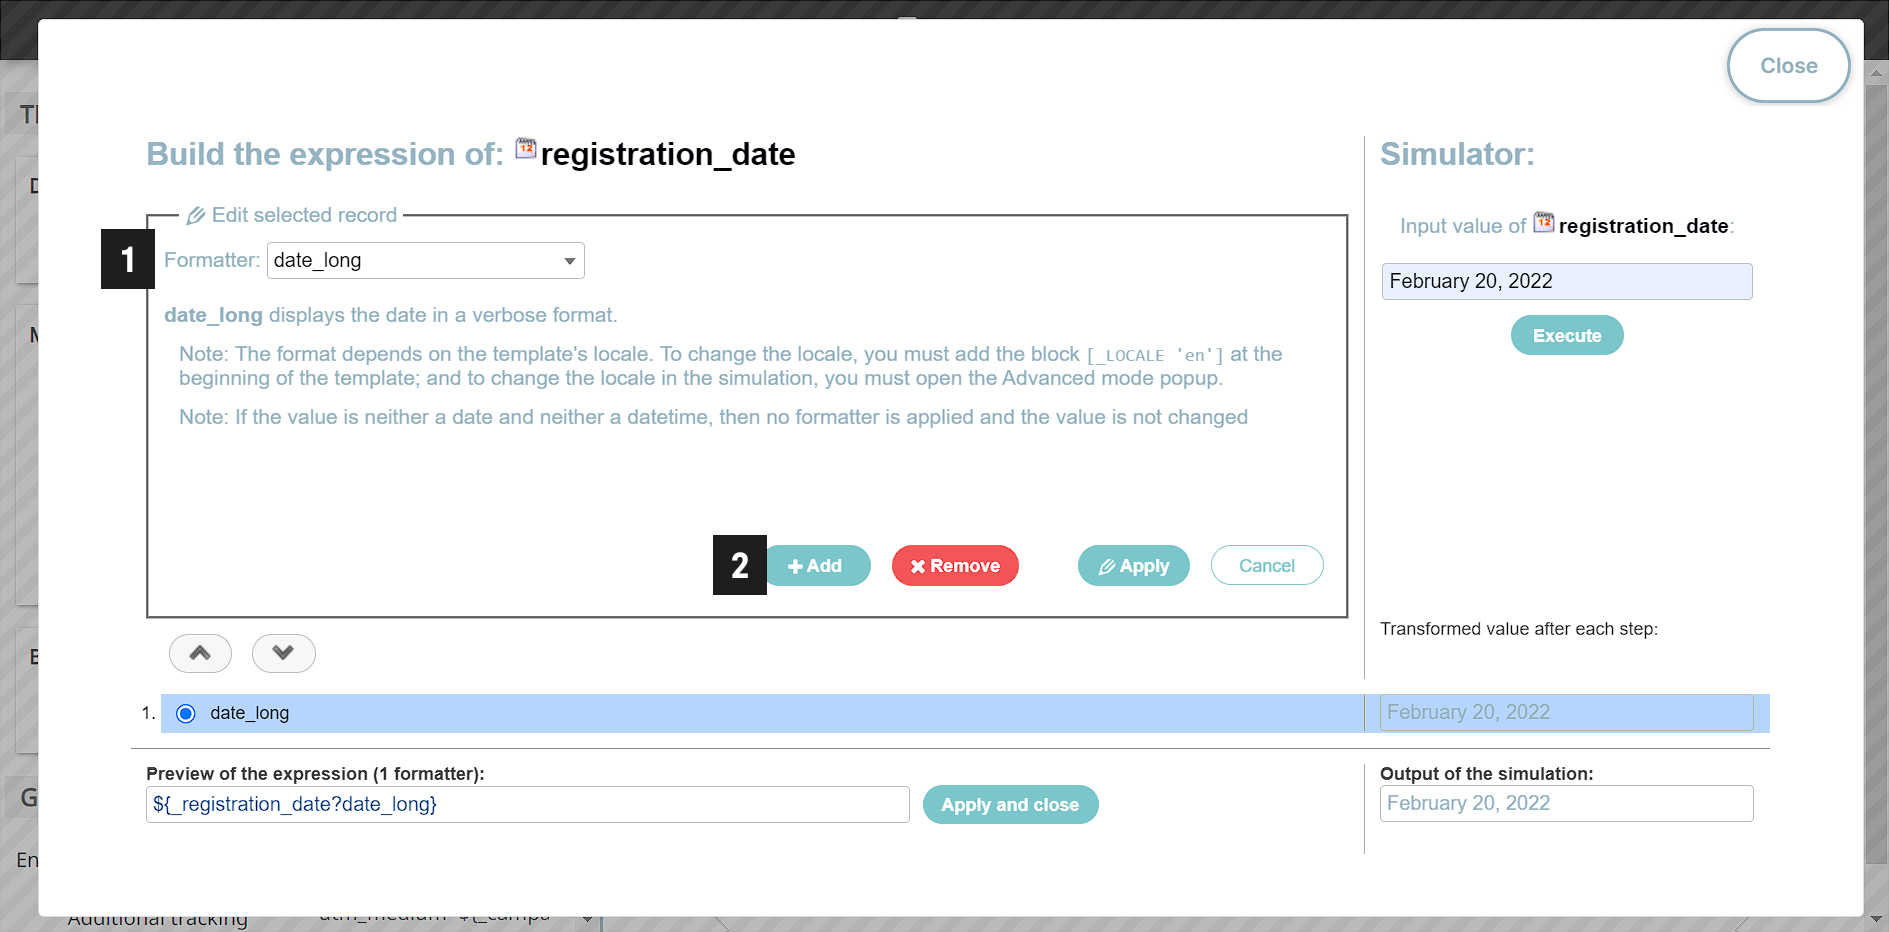
The Formatter (1) dropdown list contains all the formatters available, grouped by data type on which they can be applied : string, number, integer, date and datetime. By default, the category corresponding to the type of the selected field is listed first.
Select a formatter in the list to display its description and its parameters. To add the formatter to your expression, click on Add (2).
When your expression contains several formatters, they are applied in the order they are listed in the interface : formatter 1 is applied to the original data, formatter 2 is applied on the output of formatter 1, etc.
You can modify the formatters order within your expression using the arrows.
The simulator on the right of the interface allows you to test your expression. To launch a simulation, input the data to transform (1) and click on Execute (2) : you will be able to check the result of every formatter. The field Output of the simulation (3) returns the result of the full expression, which is how the data would appear in the received emails.
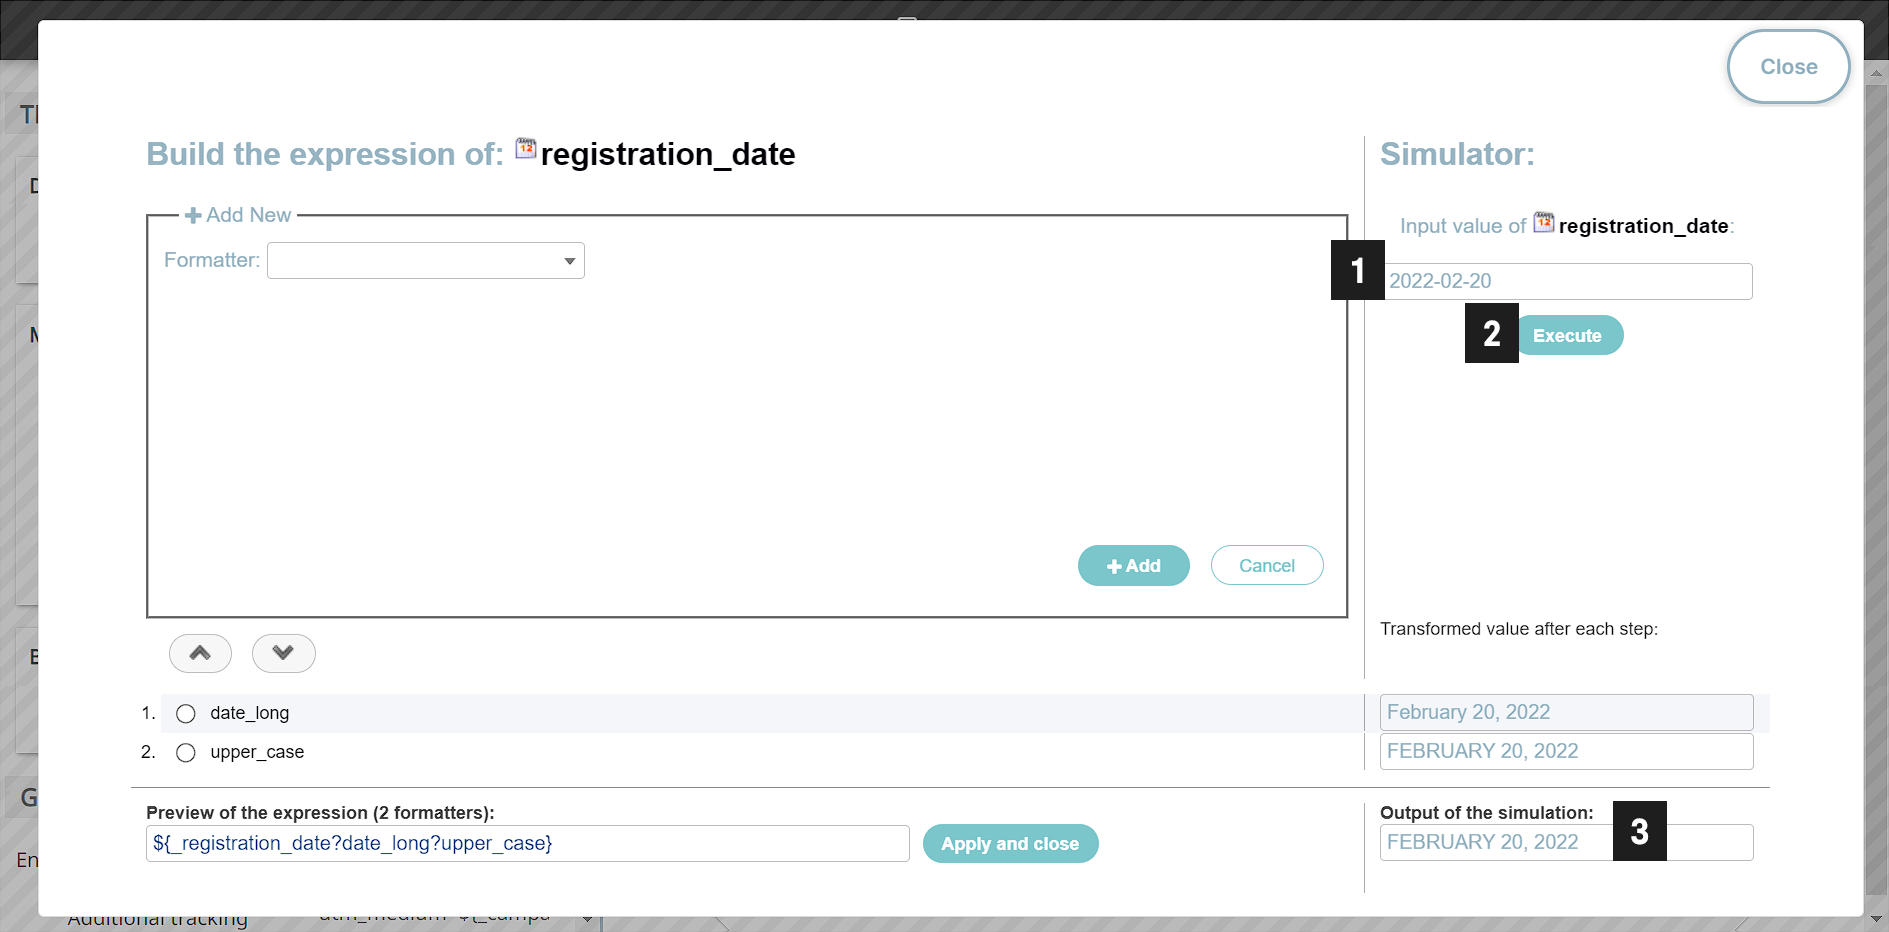
To confirm the expression and apply it to the selected personalization field in your message, click on Add and close. The expression will be automatically added to the tag in the editor.

4. Include a personalization field in the email object
Message personalization is not limited to the email body : you can also include personalization fields in the object.
The email object is configured in the Subject section of the campaign page, in the field Subject (with possible personalization).
You can select a personalization field to add to your subject line by clicking on Personalization Field +, or simply copy and paste the generated expressions into the template editor. The formatters work here in the same way as they do in templates.
The substitution subject is the email subject line sent to recipients whose personalization fields are empty. It must always be provided and cannot contain any personalization fields.
5. Main formatters
5.1. Text-typed fields
- Capitalize
The capitalize formatter converts the first letter of every word to uppercase.
Example :’jane doe’ will be displayed as ‘Jane Doe‘
- Upper_case
The upper_case formatter converts a string to uppercase.
Example :’Paris’ will be displayed as ‘PARIS‘
- Truncate
The truncate formatter truncates a text when its length is greater than a defined max value.
There are 2 parameters to define :
- max : maximum number of characters to display
- suffix : text displayed to indicate that the text has been truncated
Example : with the parameters max = 40 and suffix = ‘…’, ‘Bring the outdoors in to your interior spaces with this stunning dry grass sented candle’ will be displayed as ‘Bring the outdoors to your interior s…‘
- Pretty_truncate
The pretty_truncate formatter truncates a text when its length is greater than a defined max value, without cropping any word : the cut is applied after a dot, a comma or a space.
There are 3 parameters to define
- max : maximum number of characters to display
- min : minimum number of characters to display after truncation
- suffix : text displayed to indicate that the text has been truncated
Example :with the parameters max = 40, min = 35 and suffix = ‘…’, ‘Bring the outdoors in to your interior spaces with this stunning dry grass sented candle’ will be displayed as ‘Bring the outdoors to your interior (…)‘
5.2. Number-typed fields
- Price
The price formatter displays a number in a price format : thousands are separated with a comma and 2 numbers are displayed after the decimal point. If the original value contains only 1 decimal figure, the formatter will add a ‘0’ behind it.
Example : 1234.5 will be displayed as 1,234.50
5.3. Date/datetime-typed fields
- Date
The date formatter displays a date in MM/DD/YYYY format.
Example : 2020-12-01 will be displayed as 12/01/2020
- Dayname / Monthname
The dayname and monthname formatters allows you to extract the weekday and month (in full letters) of the date.
Examples :
- 2020-12-01 will be displayed as ‘tuesday‘
- 2020-12-01 will be displayed as ‘december‘